Halloween's coming up, have you got an idea for a costume already? Here are tried and tested ideas from Smart Parenting Parent Chat Community members. Read on how these practical parents made the whole family happy and saving their budget while at it.
1. Tinkerbell / Fairy
A fairy costume may look expensive but it's surprisingly easy to make and budget-friendly too. Practical Mom Mary Rose Francisco- Castillo shows how.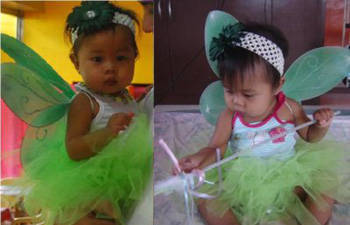
Also known as Mayumi in Smart Parenting online forum, she was motivated to make her own tutu for her daughter Nicky to cut off expenses for her first birthday party.
Looking at expensive tutus sold in malls, she figured it's just easy to make and tulle is a very affordable material. She found a no-sew tutu tutorial video over the internet and was happy with the outcome. Below is her step-by step procedure on how she made the Tinkerbell costume.
No-sew Tutu Skirt
Materials:
• 2-8 yards tulle (depends on baby's built & your desired puffiness )
• waffle headband or a ribbon,
• scissors
Procedure:
1. Cut the tulle into strips 2-4 inches wide, with the length depending on your preference.
2. After cutting, fasten the tulle strips to the headband/ribbon. You can use fabric glue or just tie it around through a loop.
3. The "through the loop" is easier to do and for this procedure, the length of the cut should be twice the desired skirt length.
4. Add more tulle strips to make the tutu thicker and fluffier.
Click here to learn more about making a Tinkerbell Halloween costume.
[previous|page|next]
Read on to learn more about making a Tinkerbell Halloween costume.
Cost:
• Tulle (illusion) - Php20.00/yard in Divisoria
• Waffle headband - about Php30.00 in Department Stores
Fairy Top materials:
• plain kiddie sando
• small fabric flower accessories (in color matching your tutu skirt)
• sewing needle, sewing thread (neutral or matching color)
Procedure:
1. Hand-sew the flower accessories around the sando's neckline.
2. You can also add some tulle strips and ribbons to make a dramatic matching from the tutu.
Cost:
• Sando - Php89.00/pair
• Flower accessories - Php50.00/pack at department stores
Mrs Castillo looks forward to using the same costume on her daughter for Hallooween.
2. Princess
Edith Tapao is a collector of kid costumes who has helped fellow Smart Parenting forum members. She herself put together her daugher Ashken Tamara's costume as Princess Aurora.

She found the first garment, a Princess Aurora top, at a second-hand clothes store. Knowing that finding the pair would be hard, she thought of copying the design and creating another style with it. She matched the top with her daughter's pink tutu skirt and added a pink cape from an old costume stock.
Accessorizing it with a wand and tiara completes the set. "Its fun creating costumes from simple plain gowns to a fairy princess costume. I cut the garment above the knee when it’s too long and turn it to a colorful fairy costume. My daughter also helps me decorate it. It's just like a day of recreation for us".
Edith is also known as Tamara at Smart Parenting Parent Chat Community.
Click here to learn more about making a Ben10 Halloween costume.
[previous|page|next]
Read on to learn more about making a Ben10 Halloween costume.
3. Ben 10
Here are 2 fabulous Ben 10 costumes from 2 dear SP members.
Both Jane Buluran and Maricel Villanueva had a hard time looking for a Ben 10 outfit for their sons so they decided to make their own instead.

Materials:
• Plain white shirt
• Black fabric paint bought from a book store
• Painters tape
• Sponge Brush
• Paint Brush
• Wax Paper
Procedure:
1. Place tape on front/center of t-shirt to make a 3 inch wide stripe. Make sure the tape is pressed firmly down on the t-shirt.
2. Place wax paper inside the shirt so the paint does not bleed through to the back of the shirt.
3. Paint inside the tape. Make sure to place the paint on evenly for best results.
4. Paint the the collar of the shirt and the edges of the sleeves.
5. Use the hem lines as the border lines.
6. Make sure to place wax paper in the sleeves and neck.
7. Let dry, turn over and do the back of the neck and sleeves.
Click here to learn more details about making a Ben10 Halloween costume.
[previous|page|next]
Read on to learn more about making a Ben10 Halloween costume.
For the pants, Jane bought a khaki cargo pants to complete Brent Miguel's outfit. Since the watch was hard to find and those available were expensive, she decided that a simple oversized plastic watch would do just fine.
Maricel VIllanueva, popularly known as mommy mycel at the SP forums, is not familiar with the character. She even had to ask her husband Andrew who is a Ben 10 follower. Searching for costumes on online stores, it was disappointing that there was no available size for a 1-year-old. The tailoring shops she knew accepted only orders in bulk. A couturier friend from Jevancy Rhofe Collection made her the green jacket as a gift.
Fellow SP Mom Jane Buluran helped Maricel through the SP forum on where to get Ben 10 outfits. Jane recommended a shirt printing service in Market Market called “Design your own T-shirt” where you you give a soft copy of the design you want.
With a small sized shirt from the department store, the Ben 10 logo printing took only less than 30 minutes. Maong pants completed the look. The omnitrix watch came from a tiangge store at the same mall for only P20.00. All these plus white sneakers from Tonton's Godfather, Antonio Reynaldo, impressed everyone. Mommy Mycel felt that completing her son's outfit was indeed a labor of love fulfilled.
3. Elvis
Roxanne Flores-Aquino put a big effort in making each Halloween a memorable occasion for her boys. She got the Elvis idea when she saw an Elvis kid on a TV ad. Having 3 boys, she thought it would be cute if all of them would be wearing the same costume. She even had to tell her kids who Elvis was and they agreed to the idea.

These costumes were actually her first clothing projects. She purchased inexpensive fabric and sequins and worked on them for two weeks. One good thing about fabric costumes is that they can be used many times. Her youngest son was even able to use his kuya's Elvis costume two years after when he was invited to a costume birthday party. This is the same with other costumes they have, they wear it on different occasions year after year until they've outgrown them.
Click here to learn more about making a Transformers Halloween costume.
[previous|page|next]
Read on to learn more about making a Transformers Halloween costume.
4. Transformers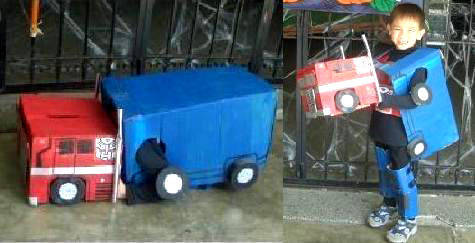
Mommy Roxanne's boys were crazy about Optimus Prime. Seeing video instructions over the Internet on how to make a Transformers costume, she tried it herself. Having the costume to "transform" posed a challenge for her. This costume also turned out to be inexpensive.
Materials:
• Cardboard box
• Styrofoam
• Garter
• Packing tape to keep flaps of the box in place
• Glue
• Paint
Procedure:
1. Cut out holes on the small box so the head and neck can fit through.
2. Cut neck and armholes on the big box.
3. Paint and design boxes.
4. Cut Styrofoam into circles for the wheel.
5. Paint the wheels.
6. Let dry and attach them to the garter strip.
7. Use excess pieces of the cardboard as a leg cover.
8. Cut, design, paint and attach velcro strips or black garter for easy wear.
According to Roxanne, "When making costumes, cost was a primary factor. I usually budget Php300 in materials per costume. If I could recycle materials just lying around in the house, I would. For some costumes, I spent much less than that. I really didn't want to spend too much so I really had to plan and think of inexpensive materials and still make it work." Having tried a lot of costumes and characters over the years, she still needs to find out what they can all come up with this Halloween to add to their tradition history.
Click here to learn more about making an Elmo costume.
[previous|page|next]
Read on to learn more about making an Elmo costume.
5. Sesame Street
All you need to do is to dress up your kid with a matching character color outfit.
Materials for Elmo:
• 1 piece red long balloon for the head
• 2 pieces small white balloon for the eyes
• 1 piece small orange balloon for the nose
• Balloon hand pump
• 1 piece rubber band cut to be used as a string
Procedure:
1. Inflate the balloon leaving 1-inch tail.
2. Make a 2-inch bubble and twist (A)
3. Make a 12-inch bubble and twist (B)
4. Bring point C to point A.

Click here to read on on how to make an Elmo balloon.
[previous|page|next]
Read on to learn more on how to make an Elmo balloon.
5. Twist together points C and A
6. Bring point D to point B and twist leaving a 2-inch bubble.
7. Elmo head is done.
8. Inflate 2 small white balloons and 1 orange balloon and tie these 3 balloons together. These will be the eyes and nose of Elmo.
9. Using the rubber band as a string, tie the eyes and nose to the center top of the head. Draw black dots on the eyes.

10. For Cookie Monster, omit the nose and make the eyes uneven.
Click here to learn more on how to make a CARS Halloween costume.
[previous|page|next]
Read on to learn more on how to make a CARS Halloween costume.
6. Cars

Materials:
• Empty box
• Red felt paper for the body
• White and light blue cartolina for the eyes and windows
• Art papers for the body stickers
• Poster paint or water color to customize sticker design
• Black belt or strap
• Glue gun, paper glue, scissors, cutter, and paint brush
Procedure:
1. Draw the car to Lightning McQueen's shape and cut along the lines with a cutter.

Click here to learn more on how to make a CARS Halloween costume.
[previous|page|next]
Read on to learn more on how to make a CARS Halloween costume.
2. Do the same on the other side.
3. Cut the bottom flaps out as well.
4. Fold along lines as shown and glue to body's front to make the car's hood.

5. Cut off 2/3 of the rear flap.
6. Cut off the excess from the front flap.

7. Cover the entire body with red felt paper using paper glue.
8. Make body sticker using art paper. Some stickers need to be customized. Paint the design on a plain paper and cut it out.
9. Estimate the size for the eyes and windows and cut the shapes out of cartolina.

10. Stick all stickers, eyes and windows with paper glue on the entire body.
11. The wheels are made of cut outs from excess carton designed with black art or felt paper and glued on to the body with glue gun.
12. Black straps glued on the top of body with a glue gun.
For Sally, follow character shape and colors. Use the same procedure using silver foil for windows and strap.
Illustrations by Jazer Basan

Lorem ipsum dolor sit amet, consectetur adipisicing elit, sed do eiusmod
Lorem ipsum dolor sit amet, consectetur adipisicing elit, sed do eiusmod