
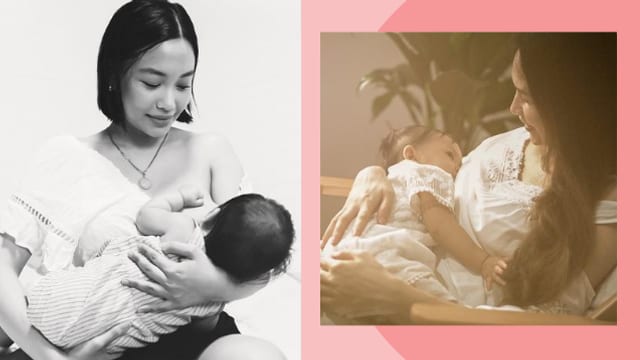
Providing liquid gold for your babies is not easy. Moms who have committed to their breastfeeding journey deserve to be celebrated and what better way than to take stunning breastfeeding portraits?
Since it is not advisable for moms and their little ones to go out of the house at the moment, veteran photographer Stanley Ong, who is also a breastfeeding advocate who holds annual photo exhibits of mothers and their babies, decided to go online this year.
What other parents are reading
In a quick interview with SmartParenting.com.ph via Facebook messenger, Stanley explains his decision to hold a virtual exhibit this August, which is also the National Breastfeeding Awareness Month. “I have been doing breastfeeding photoshoots for the last 10 years. Earlier this year, I was trying to figure out a way to do it, but [there was] too much risk [and] I didn’t want to risk everyone,” he shares. “So, on August 1, I posted a Facebook status asking moms just to post their old breastfeeding photos in the comments section.”
He adds that he was inspired to mount the exhibit after a mom messaged him not to give up. “[She said,] continue with my advocacy. Think of something different,” he recalls.
That’s when Stanley decided to make his photoshoots “accessible” to all moms who wanted to have their own gorgeous breastfeeding portrait. “I decided to a tutorial for the parents on how to do their own photoshoot at home. Then, I asked the moms to email me [the photos] and do a virtual exhibit.”
What other parents are reading
How to take your own breastfeeding portrait at home

On his YouTube channel, Stanley shares tips on taking breastfeeding photos at home so all moms can enjoy their own stunning portraits.
1. Prepare your camera.

No need for fancy equipment — Stanley says you can use your smartphone for this. Just make sure to modify your phone’s settings and change it to the highest quality JPEG. Then, set it to ‘Auto’ mode.
2. Framing mommy and baby properly

Breastfeeding portraits are shot vertically. When framing your subject, “don’t put her really close to the edge of the image,” Stanley advises. Give her head room or space to breathe (space on the side and on the lower part of the image). Avoid shooting her too close or tight, so you have the option to crop the photo if needed.
What other parents are reading
3. Prepare your shooting area

Since the shoot is at home, go around your house to look for nice lighting. It can be by the window or door — with light coming through the them. “Make sure that the light coming in is not too harsh,” Stanley says, adding that you can wait during the latter part of the day to avoid harsh sunlight coming in or utilize white curtains to diffuse harsh light.
Look for a clean background for your portrait, like a plain wall. It’s also important to avoid distraction. “If there are stuff around your shooting area, just move it aside first for the photoshoot.”
4. Position the models

Ask mommy to settle into a comfortable position for breastfeeding, whether sitting down or standing up. “If you frame your shot, try and avoid including the window or door. Move mommy on the side then frame her just a little bit away from the window,” Stanley says.
What other parents are reading
5. Choosing an appropriate attire.

Stanley suggests choosing something plain or simple for your breastfeeding top or dress. “Don’t make the color too bright. Choose something neutral in color and avoid printed designs as it distracts our attention from mommy and baby,” he says.
For his breastfeeding shoots, Stanley usually asks if smaller babies can be naked, but if you’re not comfortable, you can choose plain clothing for your little one as well.
6. Prepare mommy and baby

Before bringing in your little one to latch, ask mommy to practice posing first. “Usually I ask mommy to stand in front of the light and turn toward the light. We don’t want her to face away from the light because her face becomes dark,” Stanley says. “You can move her forward or backward, depending on how the light is illuminating mommy.”
Have her practice some poses — if she’s turning toward the light on her right side, have baby latch on the right breast so both subjects can be seen in the photo. Ask her to straighten and make small movements — turn a little to the left, chin up, and chin down. Don’t forget to frame mommy properly!
For mommies who are not comfortable showing a lot of skin, Stanley suggests holding baby’s hand and putting it near his or her mouth to cover part of your skin. Lean forward and tilt your head just a little bit (so you can still show off some neck) and have your eyes looking at baby’s head.
Don’t forget to smile! Enjoy the shoot and make it memorable.
What other parents are reading
Thanks to his tips, moms were able to send in their photos. Stan says that he is “satisfied na satisfied,” with the photos, knowing most of them are not photographers. “Ninety percent followed my instructions, while the rest submitted old photos, which for me is ok because these photos have stories as well,” he shares.
See more of Stan’s virtual exhibit below:
Watch his tips here:
Excited to share the final output of your breastfeeding photoshoot? Email Stan at stanong@stanleyongphotography.com. Share it with us at well at smartparentingsubmissions@gmail.com with the subject “breastfeeding photoshoot.”
What other parents are reading

Lorem ipsum dolor sit amet, consectetur adipisicing elit, sed do eiusmod
Lorem ipsum dolor sit amet, consectetur adipisicing elit, sed do eiusmod